Dismantling a shed can seem like a daunting task, but with the right tools, materials, and planning, it can be a manageable DIY project. Whether you’re moving to a new home, upgrading to a larger shed, or simply needing to remove an old one, dismantling a shed requires careful consideration and safety precautions.
Before you begin the process, it’s important to assess the shed’s condition and determine if it’s worth dismantling. If the shed is in poor condition or has extensive damage, it may be more cost-effective to hire a professional to remove it. However, if the shed is in good condition, dismantling it can be a great way to save money and reuse the materials.
To start the dismantling process, you’ll need the proper tools and materials, including gloves, safety glasses, a hammer, a pry bar, a screwdriver, and a saw. It’s also important to have a plan in place for where you’ll store the materials and how you’ll dispose of any waste.
Safety precautions should be taken throughout the process to avoid injury, such as wearing appropriate clothing and footwear, using caution when removing nails and screws, and having a partner to assist with heavy lifting.
Step 1: Preparation
Before you start dismantling your shed, it’s important to prepare yourself for the task at hand. This includes gathering the right tools and checking local regulations.
Gathering the Right Tools
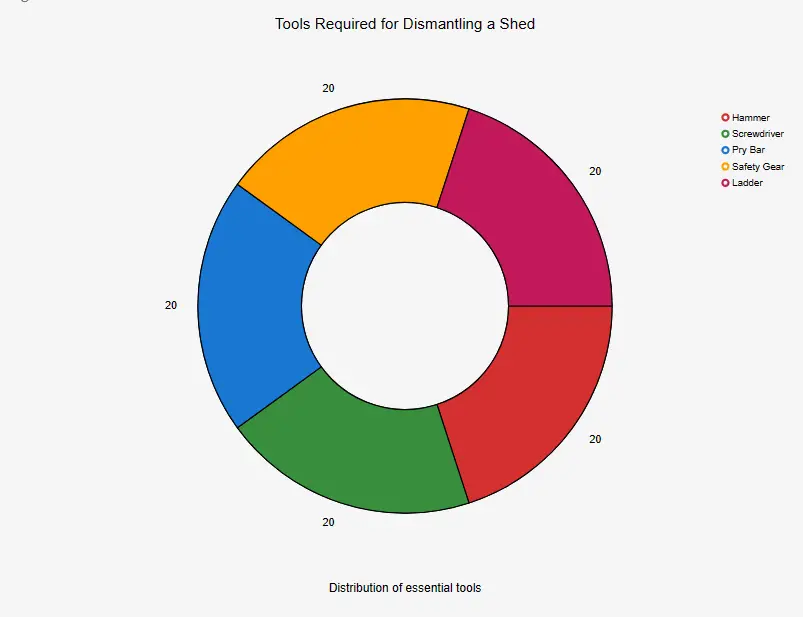
To dismantle your shed, you’ll need a few essential tools. These include:
- Hammer
- Drill
- Screwdriver
- Gloves
- Safety goggles
- Wrecking bars
- Bits
- Angle grinder
- Saw
- Ladder
- Pair of hands
Make sure you have all of these tools on hand before you start dismantling your shed. This will make the process smoother and safer.
Checking Local Regulations
Before you start dismantling your shed, it’s important to check your local regulations. Some areas have specific rules and regulations regarding the demolition of sheds and other structures. Make sure you understand these regulations before you start work.
If you’re unsure about local regulations, contact your local council or building authority for more information. They can provide you with guidance on what you can and cannot do when dismantling your shed.
In summary, before you start dismantling your shed, gather all the necessary tools and check your local regulations. This will help ensure that the process goes smoothly and safely.
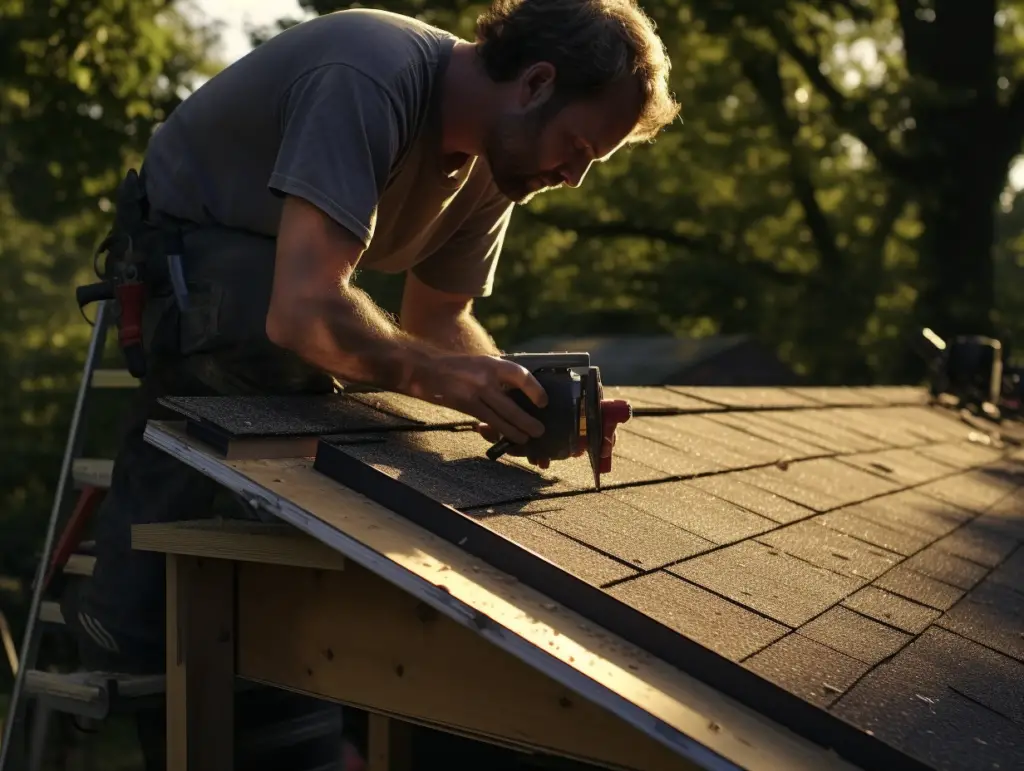
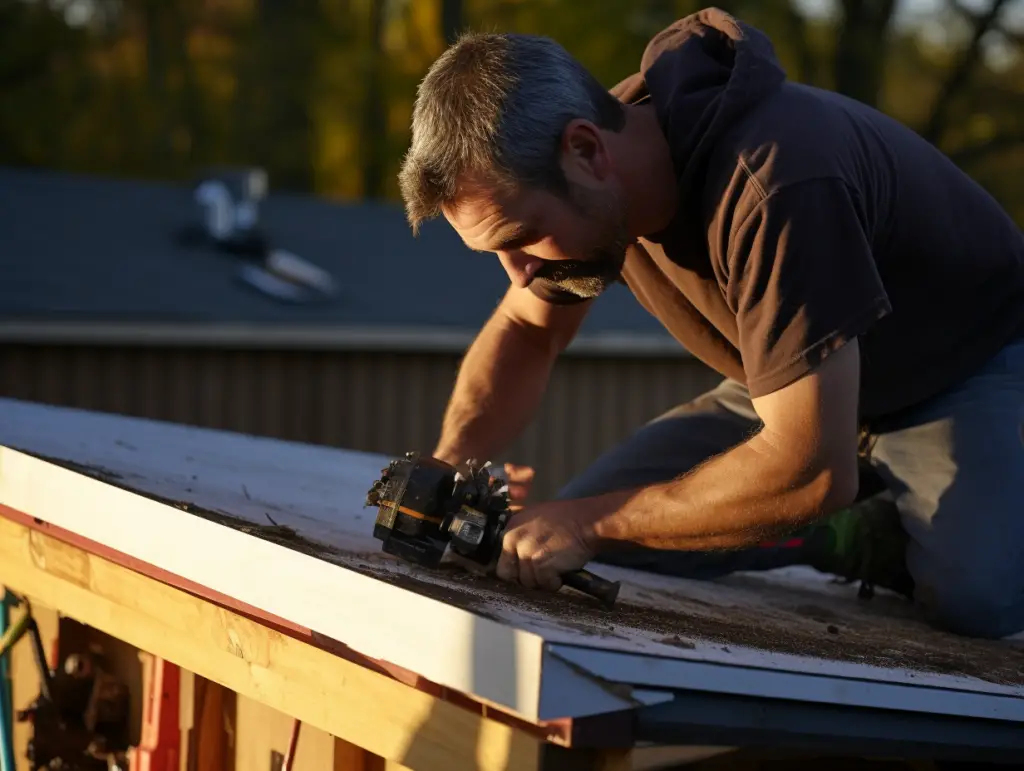
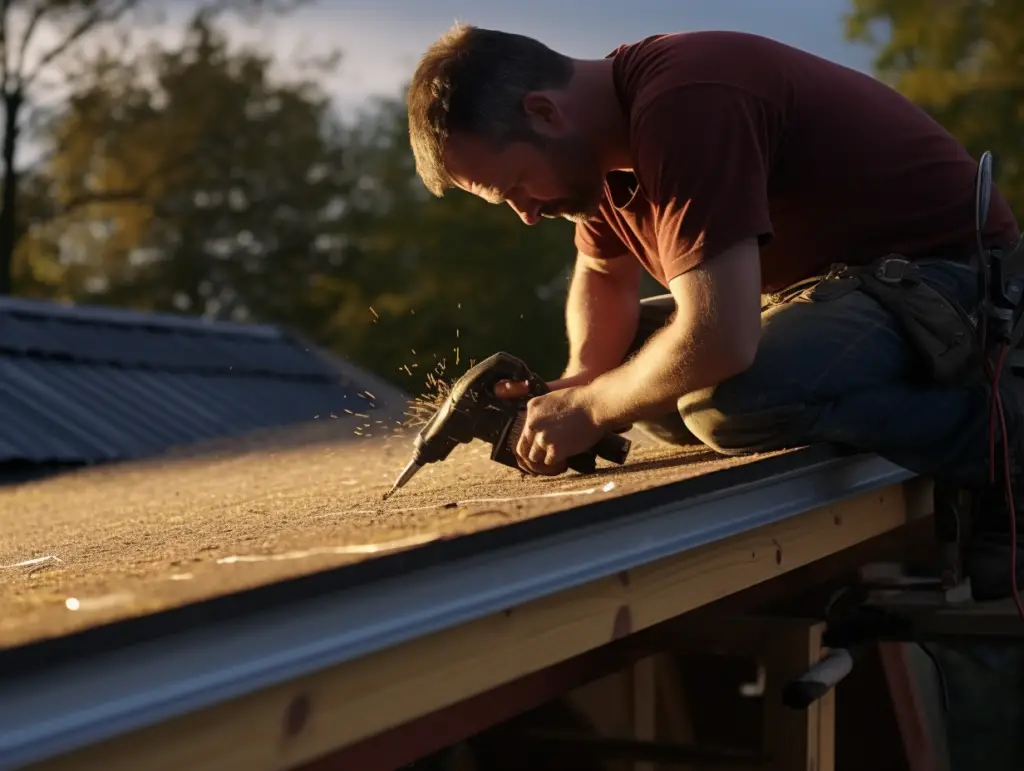
Step 2: Removing the Roof
When it comes to dismantling a shed, removing the roof is often the most challenging part of the process. It requires some effort and caution to ensure that you don’t damage the shed’s structure or injure yourself. Here are the steps to follow when removing the roof:
Removing Roof Covering

The first step in removing the roof is to take off the roof covering. This is likely to be nailed down, so you’ll need a hammer to remove the nails. If the roof covering is made of tiles or shingles, you’ll need to remove them one by one. If it’s made of metal sheets, you’ll need to unscrew them.
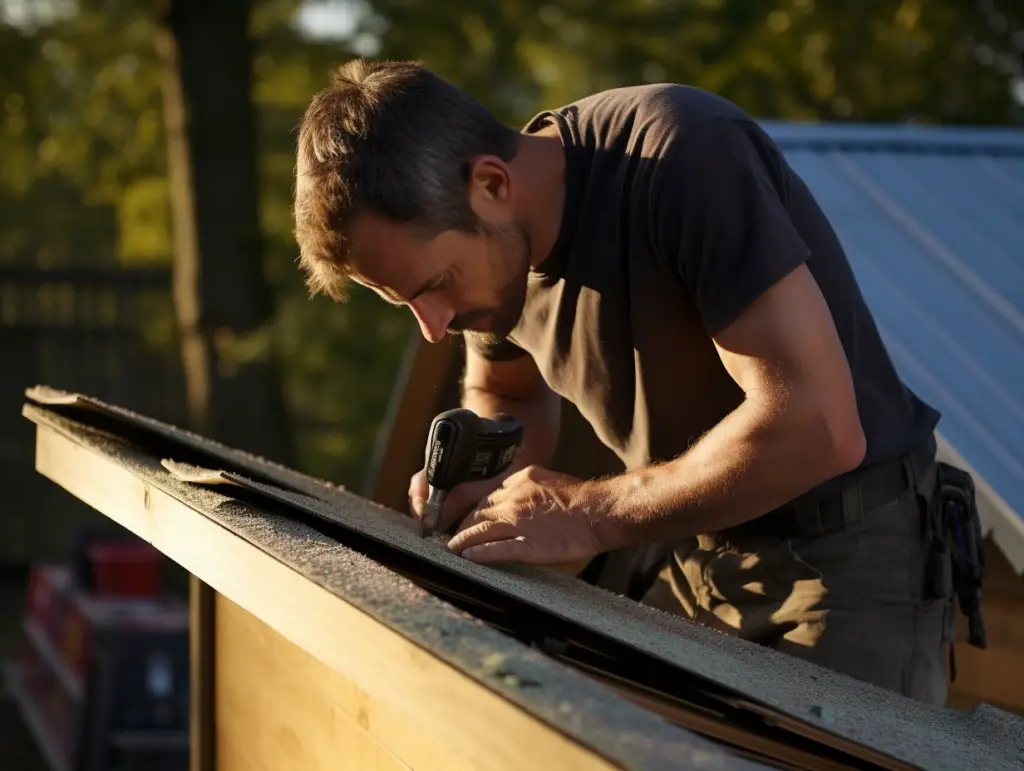
Removing Roof Panels
Once you’ve removed the roof covering, you can start taking off the roof panels. This is likely to be the heaviest and hardest part of the process, so you’ll need a helping hand. Here’s how to go about it:
- Start by removing any insulation that’s between the roof panels. This will make the panels lighter and easier to handle.
- Use a crowbar to pry off the tongue and groove joints between the panels. Be careful not to damage the panels or the shed’s structure.
- Once you’ve removed the tongue and groove joints, you can start taking off the roof panels one by one. They’re likely to be held in place by nails or screws, so you’ll need to remove them using a hammer or a screwdriver.
As you remove the roof panels, make sure to stack them neatly to the side. You can reuse them if you plan on rebuilding the shed or use them for other projects.
In conclusion, removing the roof is a crucial step in dismantling a shed. It requires some effort and caution, but with the right tools and techniques, you can do it safely and efficiently. Remember to remove the roof covering first and then take off the roof panels one by one.
Step 3: Dismantling Walls and Panels
Once you have removed the roof covering and deck, it’s time to dismantle the walls and panels of your shed.
This step requires some careful planning and execution to avoid damaging the panels or injuring yourself. Here are the sub-steps to follow:
Removing Doors and Windows
Before you start dismantling the walls and panels, it’s best to remove the doors and windows first. This will help protect them from damage and make the wall panels lighter.
To remove the doors, unscrew the hinges and carefully lift them off. For windows, remove any screws or nails holding them in place and gently pry them out.
Removing Wall Panels
The next step is to remove the wall panels. Depending on the type of shed you have, this may involve prying off wood panels or removing screws and nails from siding. If your shed has wood panels, use a pry bar to gently pry them off.
If your shed has siding, use a screwdriver or crowbar to remove the screws or nails holding the panels in place.
Once you have removed the panels, stack them neatly and remove any remaining screws or nails from the frame. Be sure to label the panels to make it easier to reassemble the shed later.
Additional Tips
Here are some additional tips to keep in mind when dismantling your shed walls and panels:
- Wear protective gear such as gloves and safety glasses to avoid injuries.
- Use caution when using a pry bar or crowbar to avoid damaging the panels or frame.
- If your shed has fixtures and fittings such as lights or shelves, remove them before dismantling the walls and panels.
- If you plan to reuse the panels, be sure to store them in a dry place to avoid warping or damage.
By following these steps, you can safely and efficiently dismantle the walls and panels of your shed.
Step 4: Disassembling the Shed Base
When dismantling a shed, it is important to start with the base of the shed. This is because the base provides the foundation for the entire structure. In this section, we will discuss the steps involved in disassembling the shed base.
Removing Floor Boards
The first step in disassembling the shed base is to remove the floorboards. Most sheds have a wooden floor that is made up of tongue and groove plywood. To remove the floorboards, you will need a drill or a claw hammer.
- Start by removing any screws or nails that are holding the floorboards in place.
- Once all the screws or nails have been removed, lift the floorboards out of the shed and set them aside.
Dismantling the Wooden Base
After the floorboards have been removed, you can start dismantling the wooden base. The base of the shed is usually made up of framing and gables that are held together with screws or nails. To dismantle the wooden base, follow these steps:
- Start by removing any screws or nails that are holding the framing and gables together.
- Once all the screws or nails have been removed, carefully dismantle the framing and gables.
- Set aside any salvageable pieces of wood for future use.
By following these steps, you can easily disassemble the shed base. It is important to take your time and work carefully to avoid damaging any of the shed components. With a little patience and some basic tools, you can dismantle a shed in no time.
Step 5: Moving the Shed
Once you have successfully dismantled your shed, it’s time to move it to its new location. This step can be challenging, especially if you’re moving a large shed. However, with the right transportation options and techniques, you can make the process easier and more efficient.
Transportation Options
There are several transportation options available for moving a shed, including:
- Trailer: One of the most popular options is to move the shed on a trailer. This method is ideal for larger sheds that cannot be moved by hand. You can rent a trailer from a local rental company, or you can use your own trailer if you have one. Make sure to secure the shed to the trailer properly to prevent any damage during transportation.
- Vehicle: If you have a smaller shed, you may be able to move it using a vehicle. You can attach a tow bar to the shed and tow it behind your car or truck. However, make sure that your vehicle is strong enough to handle the weight of the shed.
Moving a Shed on a Trailer
Moving a shed on a trailer is a popular option, but it requires some preparation. Here are the steps you need to follow:
- Measure the shed: Before you start, measure the shed to make sure it will fit on the trailer. You don’t want to get halfway through the process only to realize that the shed is too big for the trailer.
- Prepare the shed: Secure the shed to the trailer using straps or chains. Make sure that the shed is level and balanced on the trailer to prevent any damage during transportation.
- Load the shed: Use a forklift or a group of people to carefully load the shed onto the trailer. Make sure that the shed is centered on the trailer and that it’s properly secured.
- Transport the shed: Drive the trailer slowly and carefully to the new location. Avoid any sudden stops or turns that could cause the shed to shift or tip over.
Eco-Friendly Options
If you’re looking for an eco-friendly option for moving your shed, consider using a recycled or eco-base. These bases are made from recycled materials and are designed to be environmentally friendly. They’re also easy to install and can be used for sheds of all sizes.
Alternatively, you can use a concrete base. While not as eco-friendly as a recycled or eco-base, a concrete base is durable and long-lasting. It’s also easy to install and can provide a stable foundation for your shed.
Moving a shed can be a challenging task, but with the right transportation options and techniques, you can make the process easier and more efficient. Whether you’re using a trailer or a vehicle, make sure to prepare the shed properly and secure it tightly to prevent any damage during transportation.
Step 6: Cleaning Up and Reusing Materials
Once you have successfully disassembled your old shed, it’s time to clean up the area and identify any materials that can be reused or recycled. This step not only helps you save money but also reduces waste and benefits the environment.
Sorting the Materials
Start by sorting the materials into piles of wood, metal, and other materials. This will make it easier to identify which materials can be reused, recycled, or disposed of. Check for any fixtures and fittings that can be salvaged, such as door handles, hinges, and screws.
Reusing the Materials
Before disposing of any materials, consider reusing them for other projects. For example, the wood can be used to build a new shed or for other DIY projects around the house. Metal materials can be sold to a scrapyard or used for other metalworking projects.
Recycling the Materials
If you cannot reuse the materials, consider recycling them. Many recycling centers accept wood, metal, and other materials from old sheds. This is a great way to reduce waste and help the environment.
Cost and Time Considerations
Cleaning up and reusing materials from your old shed can save you money on your next project. However, it’s important to consider the time and effort required to clean up and sort the materials. If you don’t have the right tools or experience, it may be best to hire a professional to help you with this step.
Disassembling and Moving the Shed
If you plan to disassemble and move the shed to a new location, it’s important to take photographs of the shed before you start. This will help you remember how to reassemble the shed in its new location. It’s also important to have the right tools and experience to disassemble the shed safely and efficiently.
Conclusion
Cleaning up and reusing materials from your old shed is an important step in the process of dismantling a shed. It can save you money, reduce waste, and benefit the environment. Just be sure to take the time to sort and identify the materials, and consider reusing or recycling them before disposing of them.
![What Gravel To Use For Patio Base [Best Options]](https://www.cleverpatio.com/wp-content/uploads/2021/11/What-Gravel-To-Use-For-Patio-Base-270x180.jpg)


Leave a Reply